¶ Acts of vehicle assignment to a driver: creation, statuses, and representation in the Timetable
In this article, we will look at how Handover Acts work in MyTaxiCRM, how they are displayed in the «Timetable» section, and how a car is transferred (assigned) to a driver from the fleet.
¶ Where handover acts can be viewed?
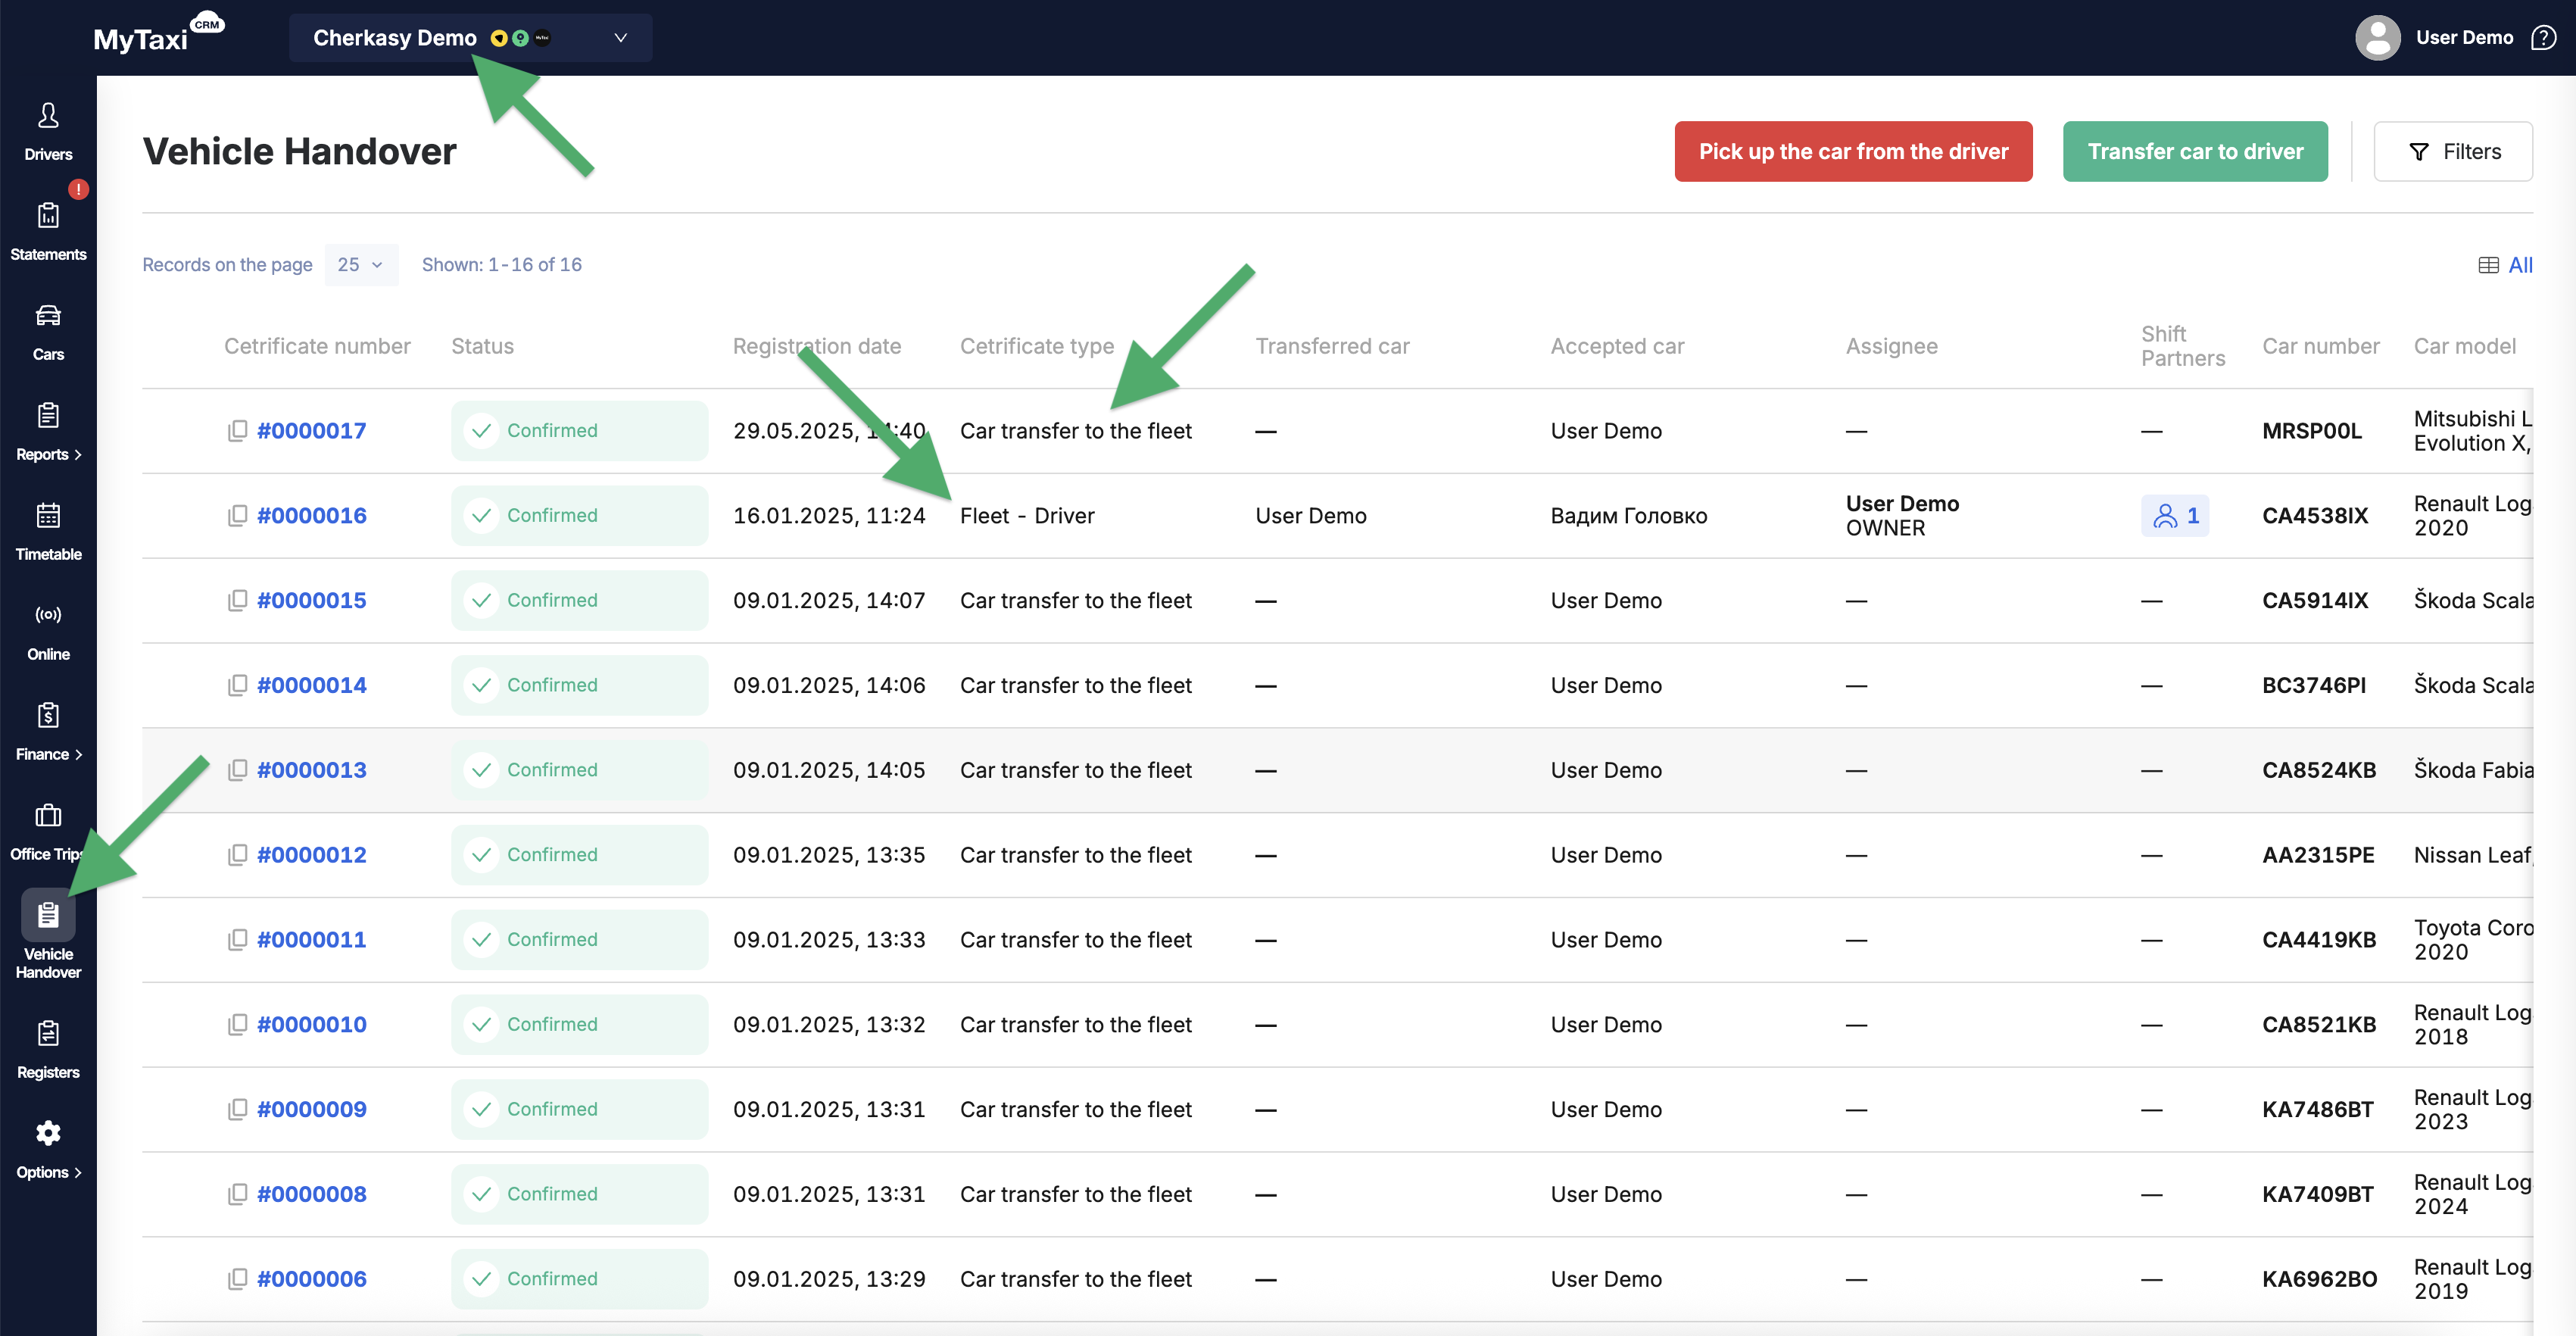
The «Vehicle Handover» section (corresponding button in the MyTaxiCRM menu on the left; available at the specific fleet level) displays all acts for the selected vehicle fleet.
- Acts of the «Car transfer to the fleet» are created automatically by the system when a new car profile card is added to the fleet balance (adds to the fleet).
- Acts of the «Fleet – Driver» type are created manually by the fleet owner or manager in the MyTaxiCRM system when transferring (assigning) a car to a specific driver.
⚠️ The last type of handover act is used specifically to ensure that the driver whose work is scheduled in the «Timetable» receives the vehicle on which the trips will be made.
The table in the «Vehicle Handover» section displays the following data in the corresponding columns:
- Names of persons transferring and receiving the car (Transferred car & Accepted car).
- Crew composition, if specified in the schedule (Assignee & Shift Partners).
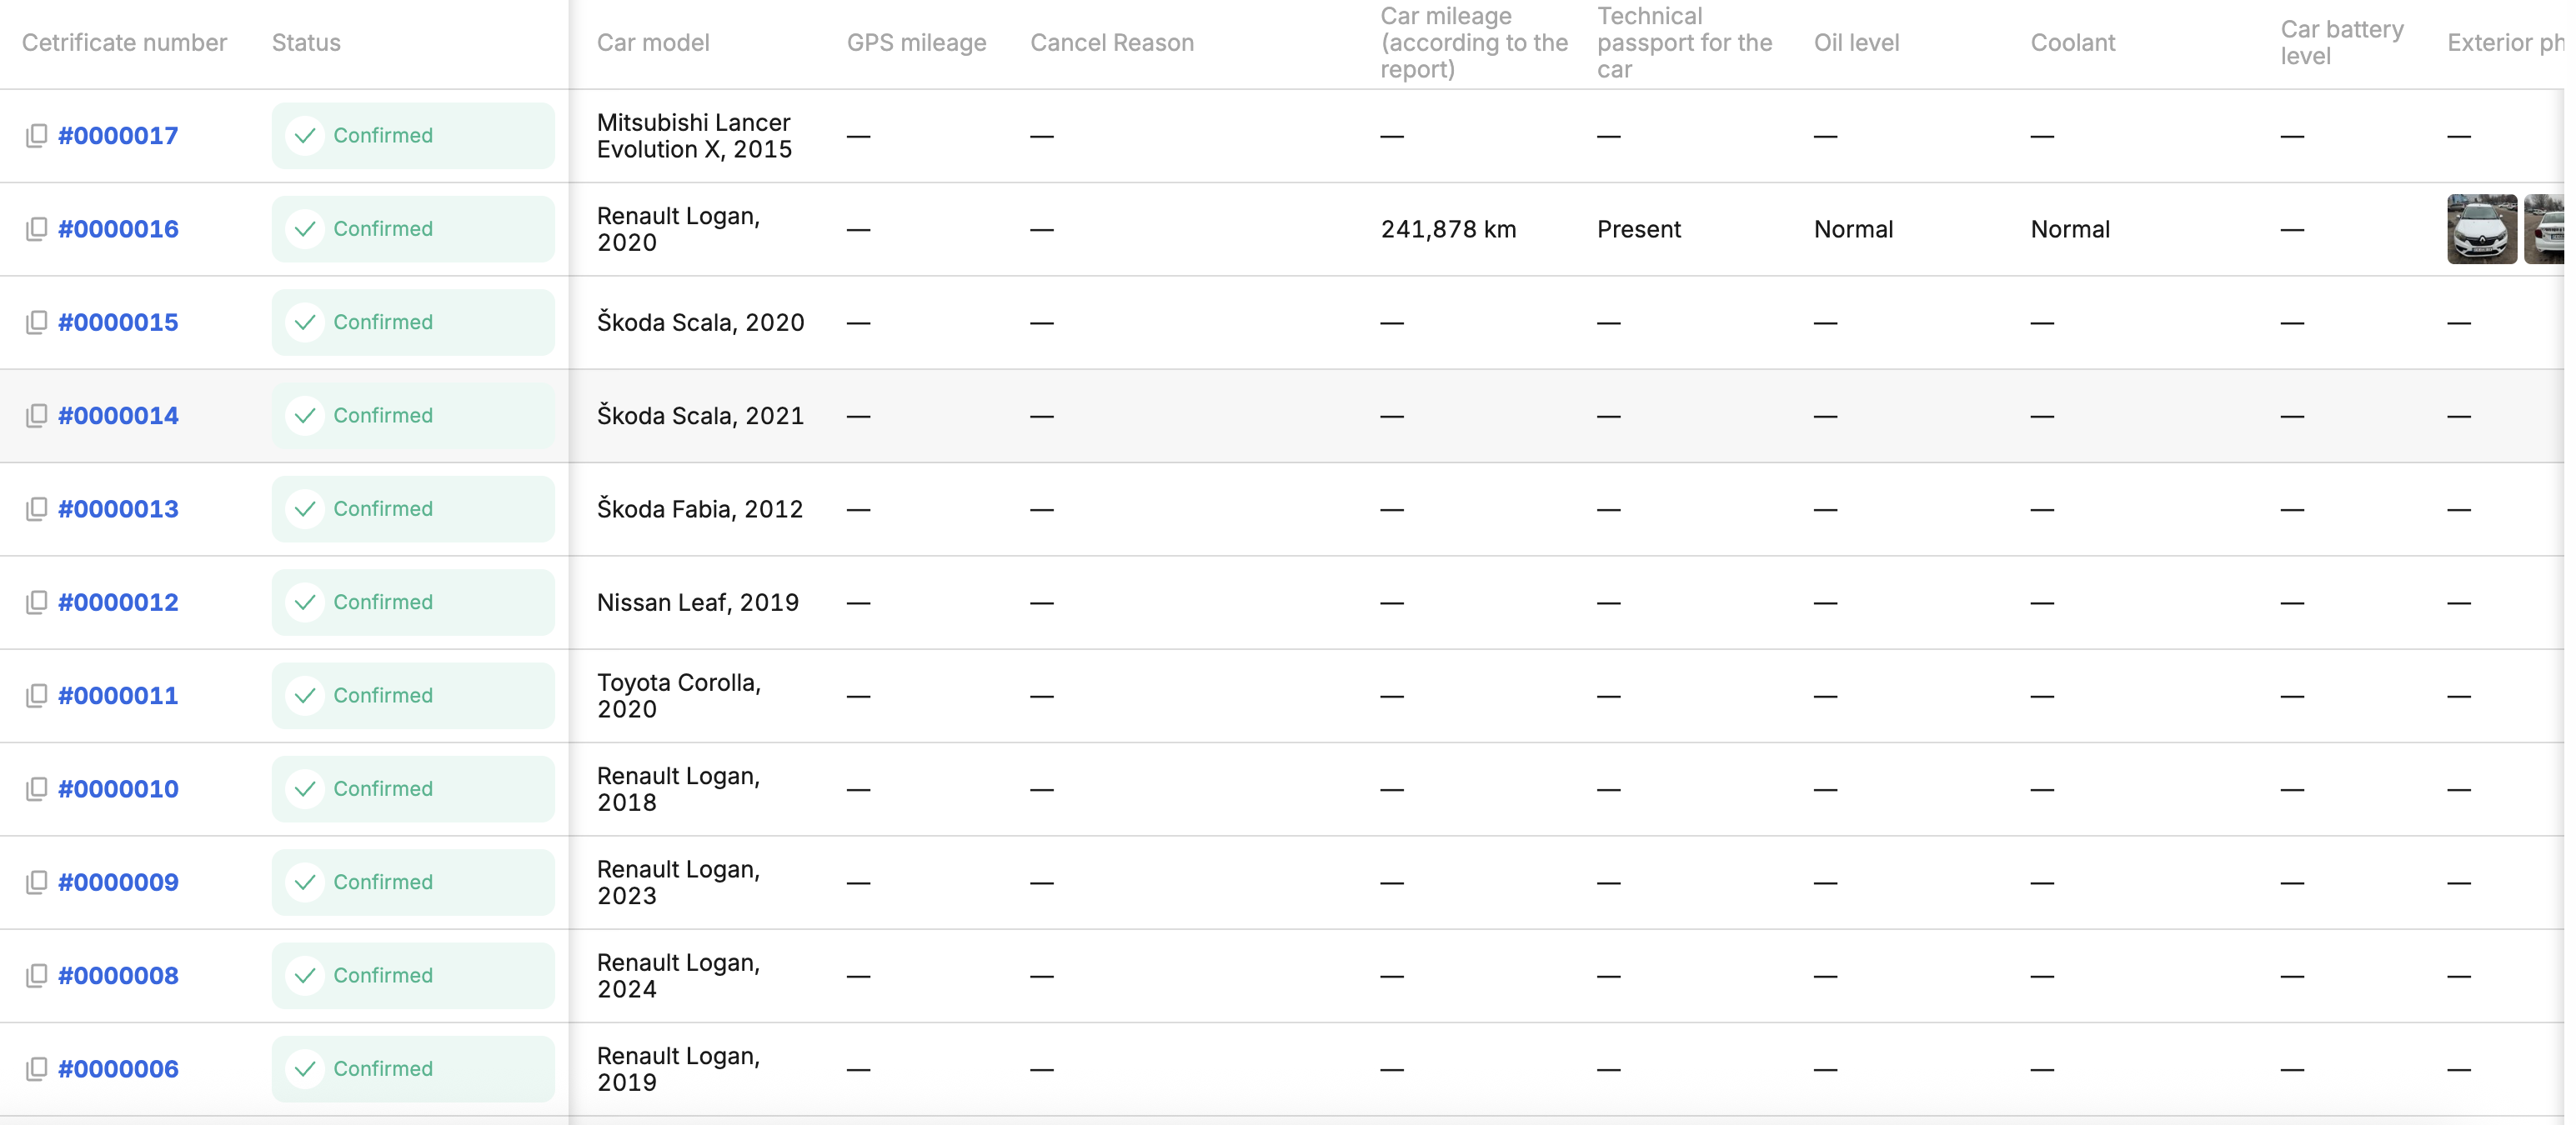
- Registry and quantitative vehicle data:
- Car number – registration plate number (car's numberplate);
- Car model – car model & make (brand), year of manufacture;
- GPS mileage – actual mileage (kilometrage) from the GPS device (if equipped);
- Car mileage (according to the report) – the mileage (kilometrage) of the car from the last handover act created in the system by the driver or manager;
- Technical passport for the car – indicates the presence/availability of a vehicle registration document;
- Oil level – info on the technical shape at the time of handing over;
- Coolant – info on the technical shape at the time of handing over;
- Car battery level – battery charge state at the time of handover (only applicable to EV/BEV);
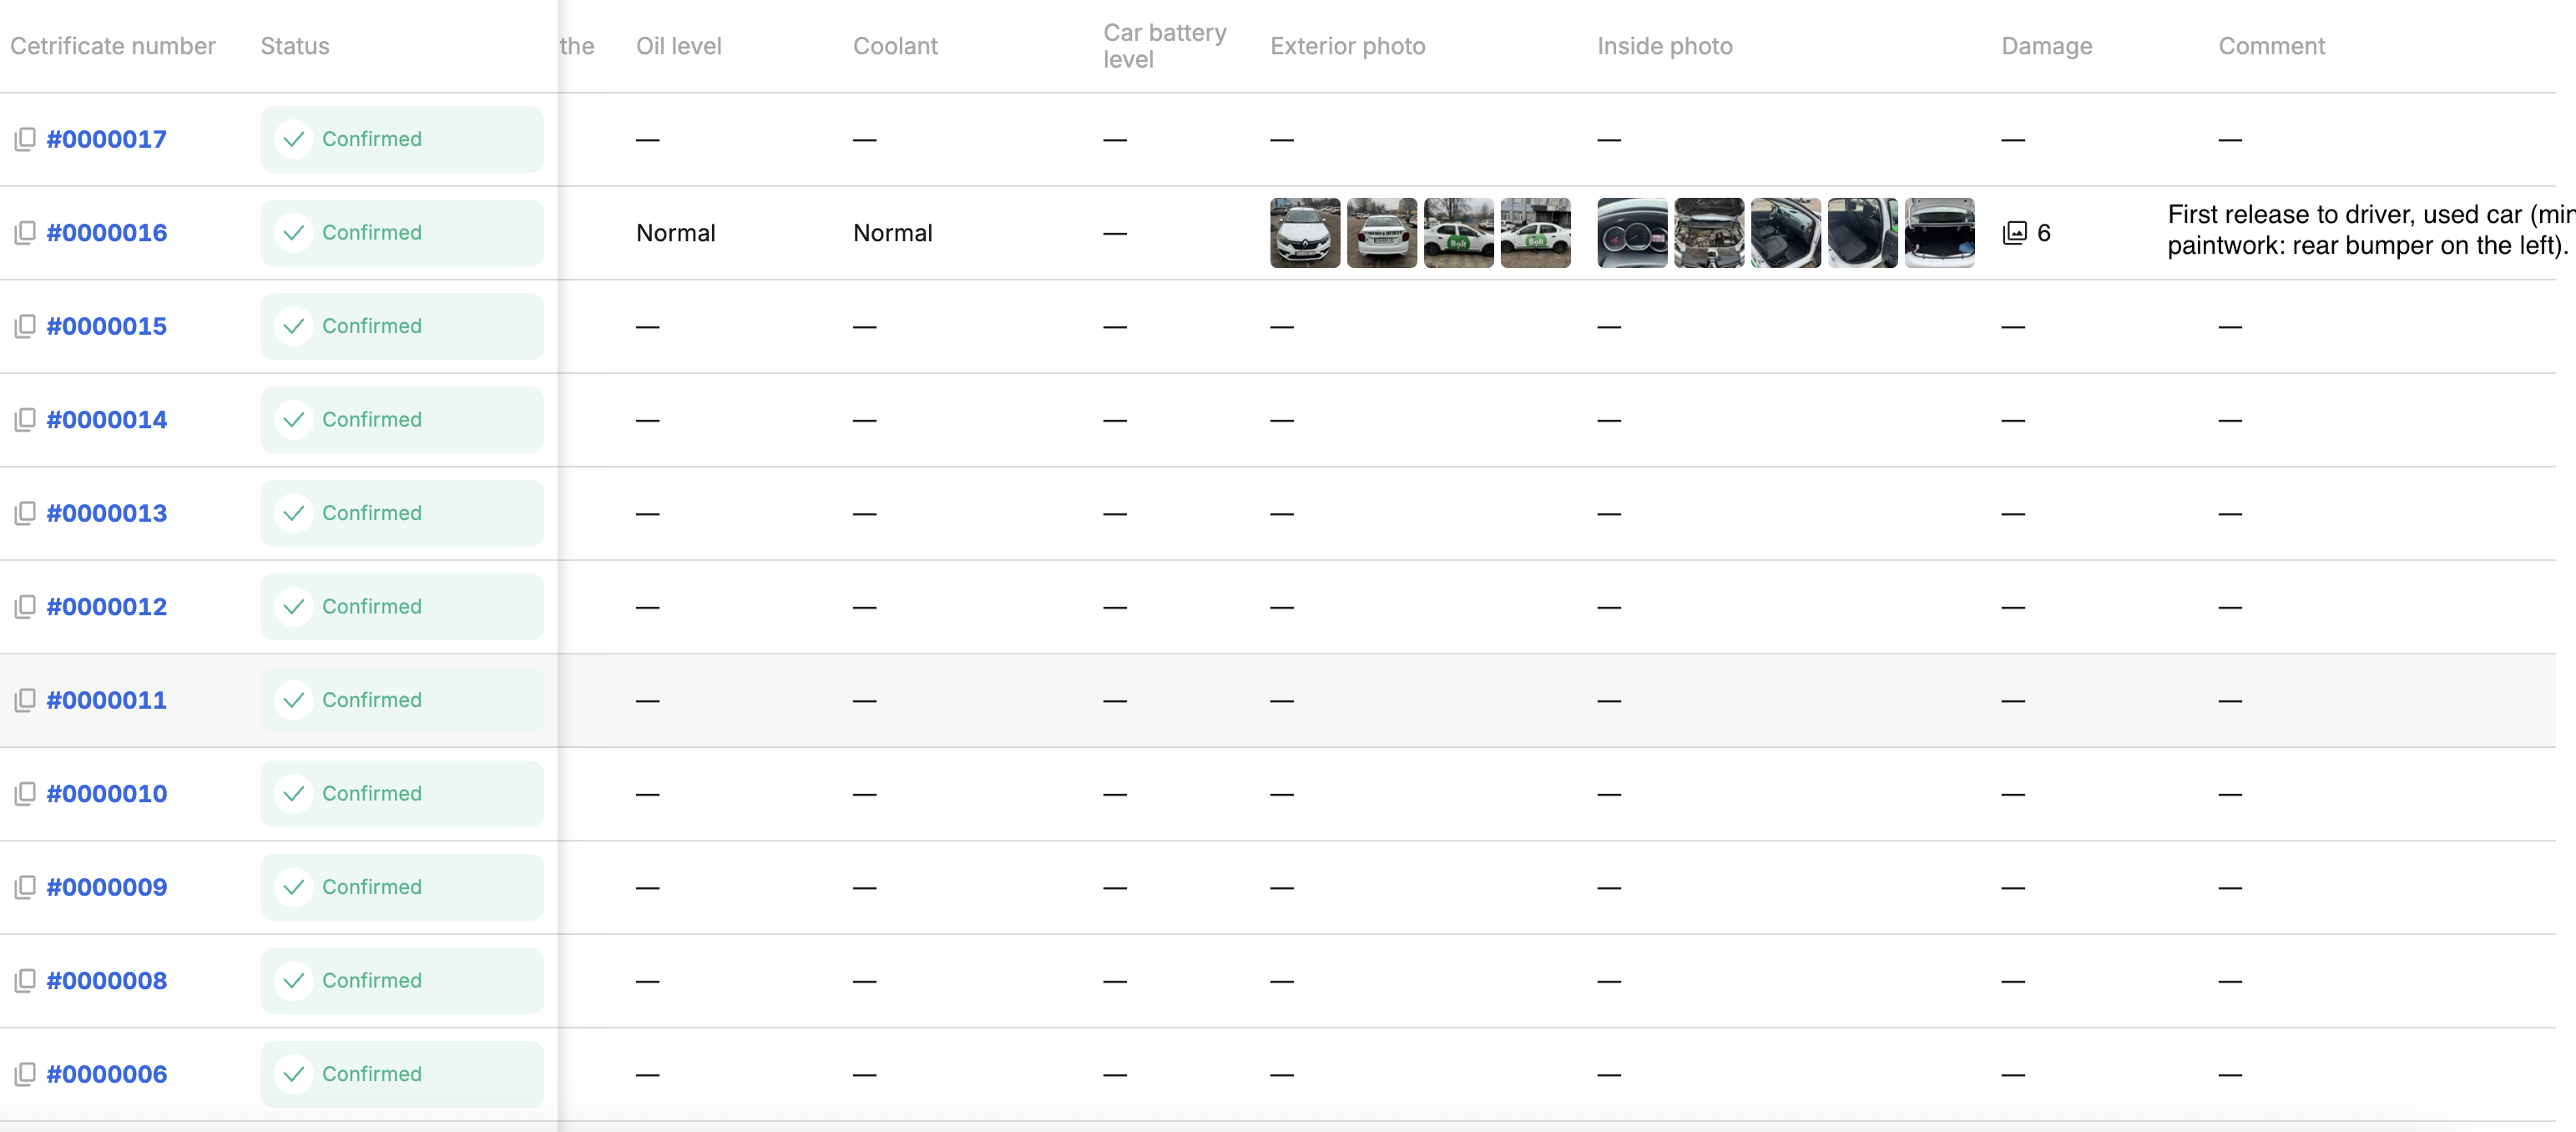
- Exterior photo – uploaded photos of the external condition of the vehicle from the last handover act created in the system by the driver or manager;
- Inside photo – uploaded photos of the condition of the vehicle interior from the last handover act created in the system by the driver or manager;;
- Damage – photographs of damaged areas of the car body, components, parts, and assemblies, if any, uploaded during the creation of the latest handover act;
- Comment – text of the note left in the previous handover act.
¶ Page viewing options
To hide columns or change the order in which they appear in the table, use the All button. In the dialog box that pops up:
- Use the blue toggle switch to the right of each column name to hide/show it to the table.
- Using the icon in the form of 6 gray dots to the left of each column name, click and drag up/down. This will change the order of the columns in the table from left to right.
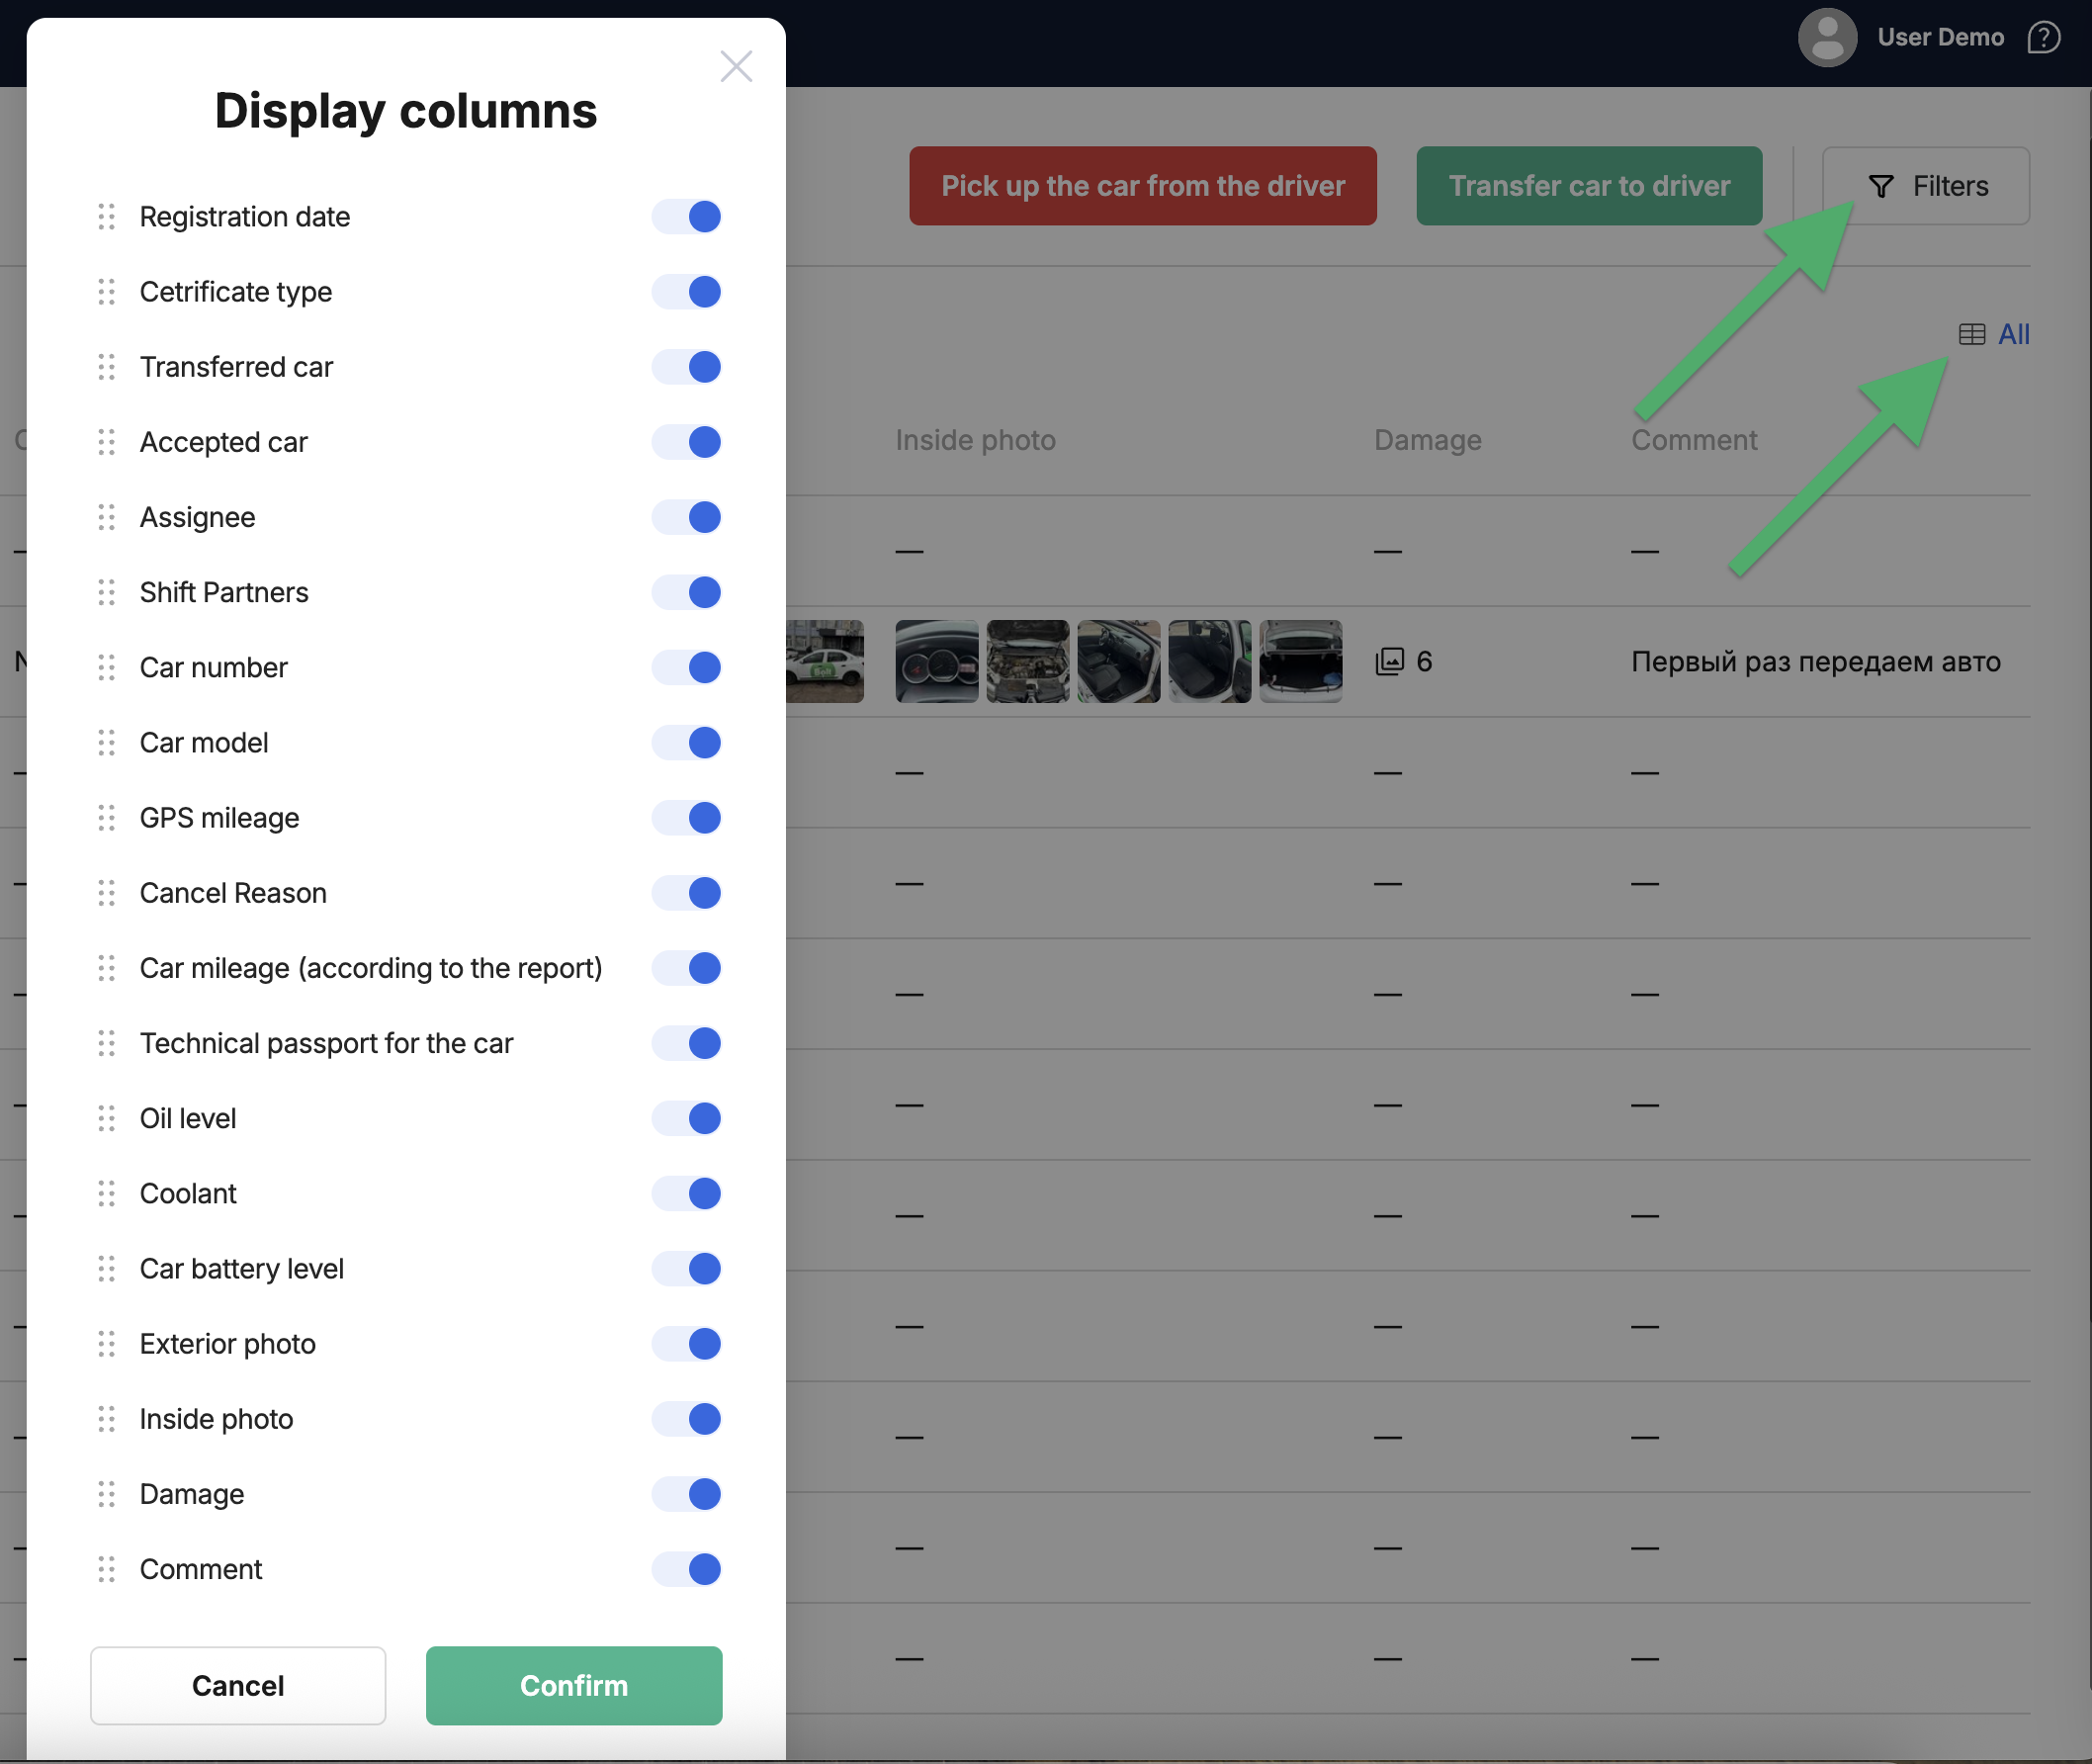
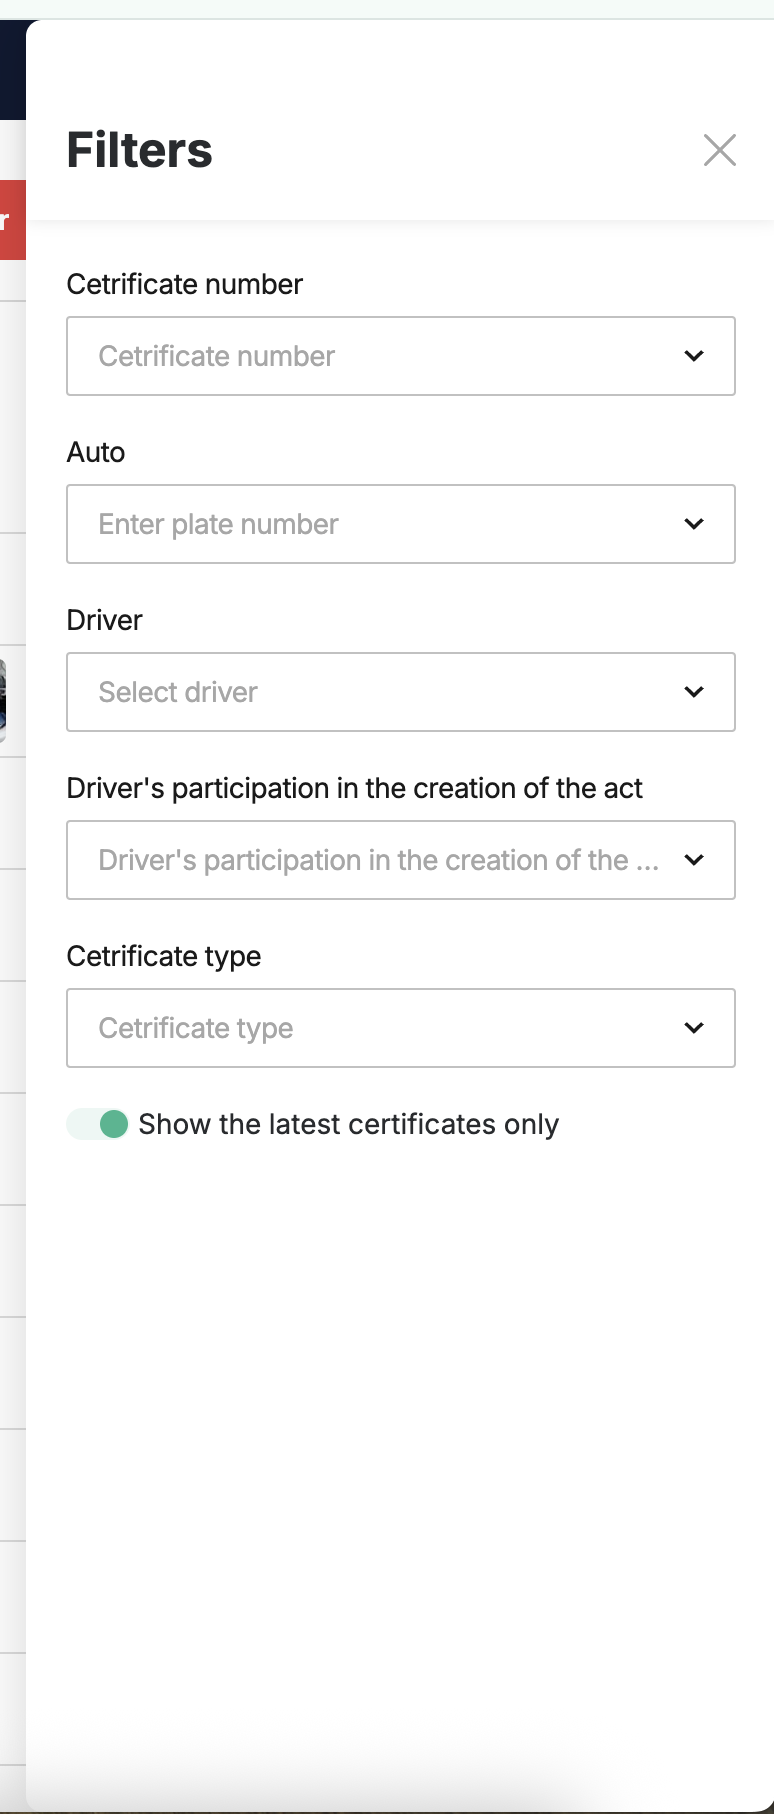
You can also filter the data in the table (Filters button at the top right):
- by the number of the handover act itself;
- by a specific car;
- by a specific driver;
- by the driver's involvement in creating handover acts;
- by act type.
¶ Creation of a car issuance act: Fleet → Driver
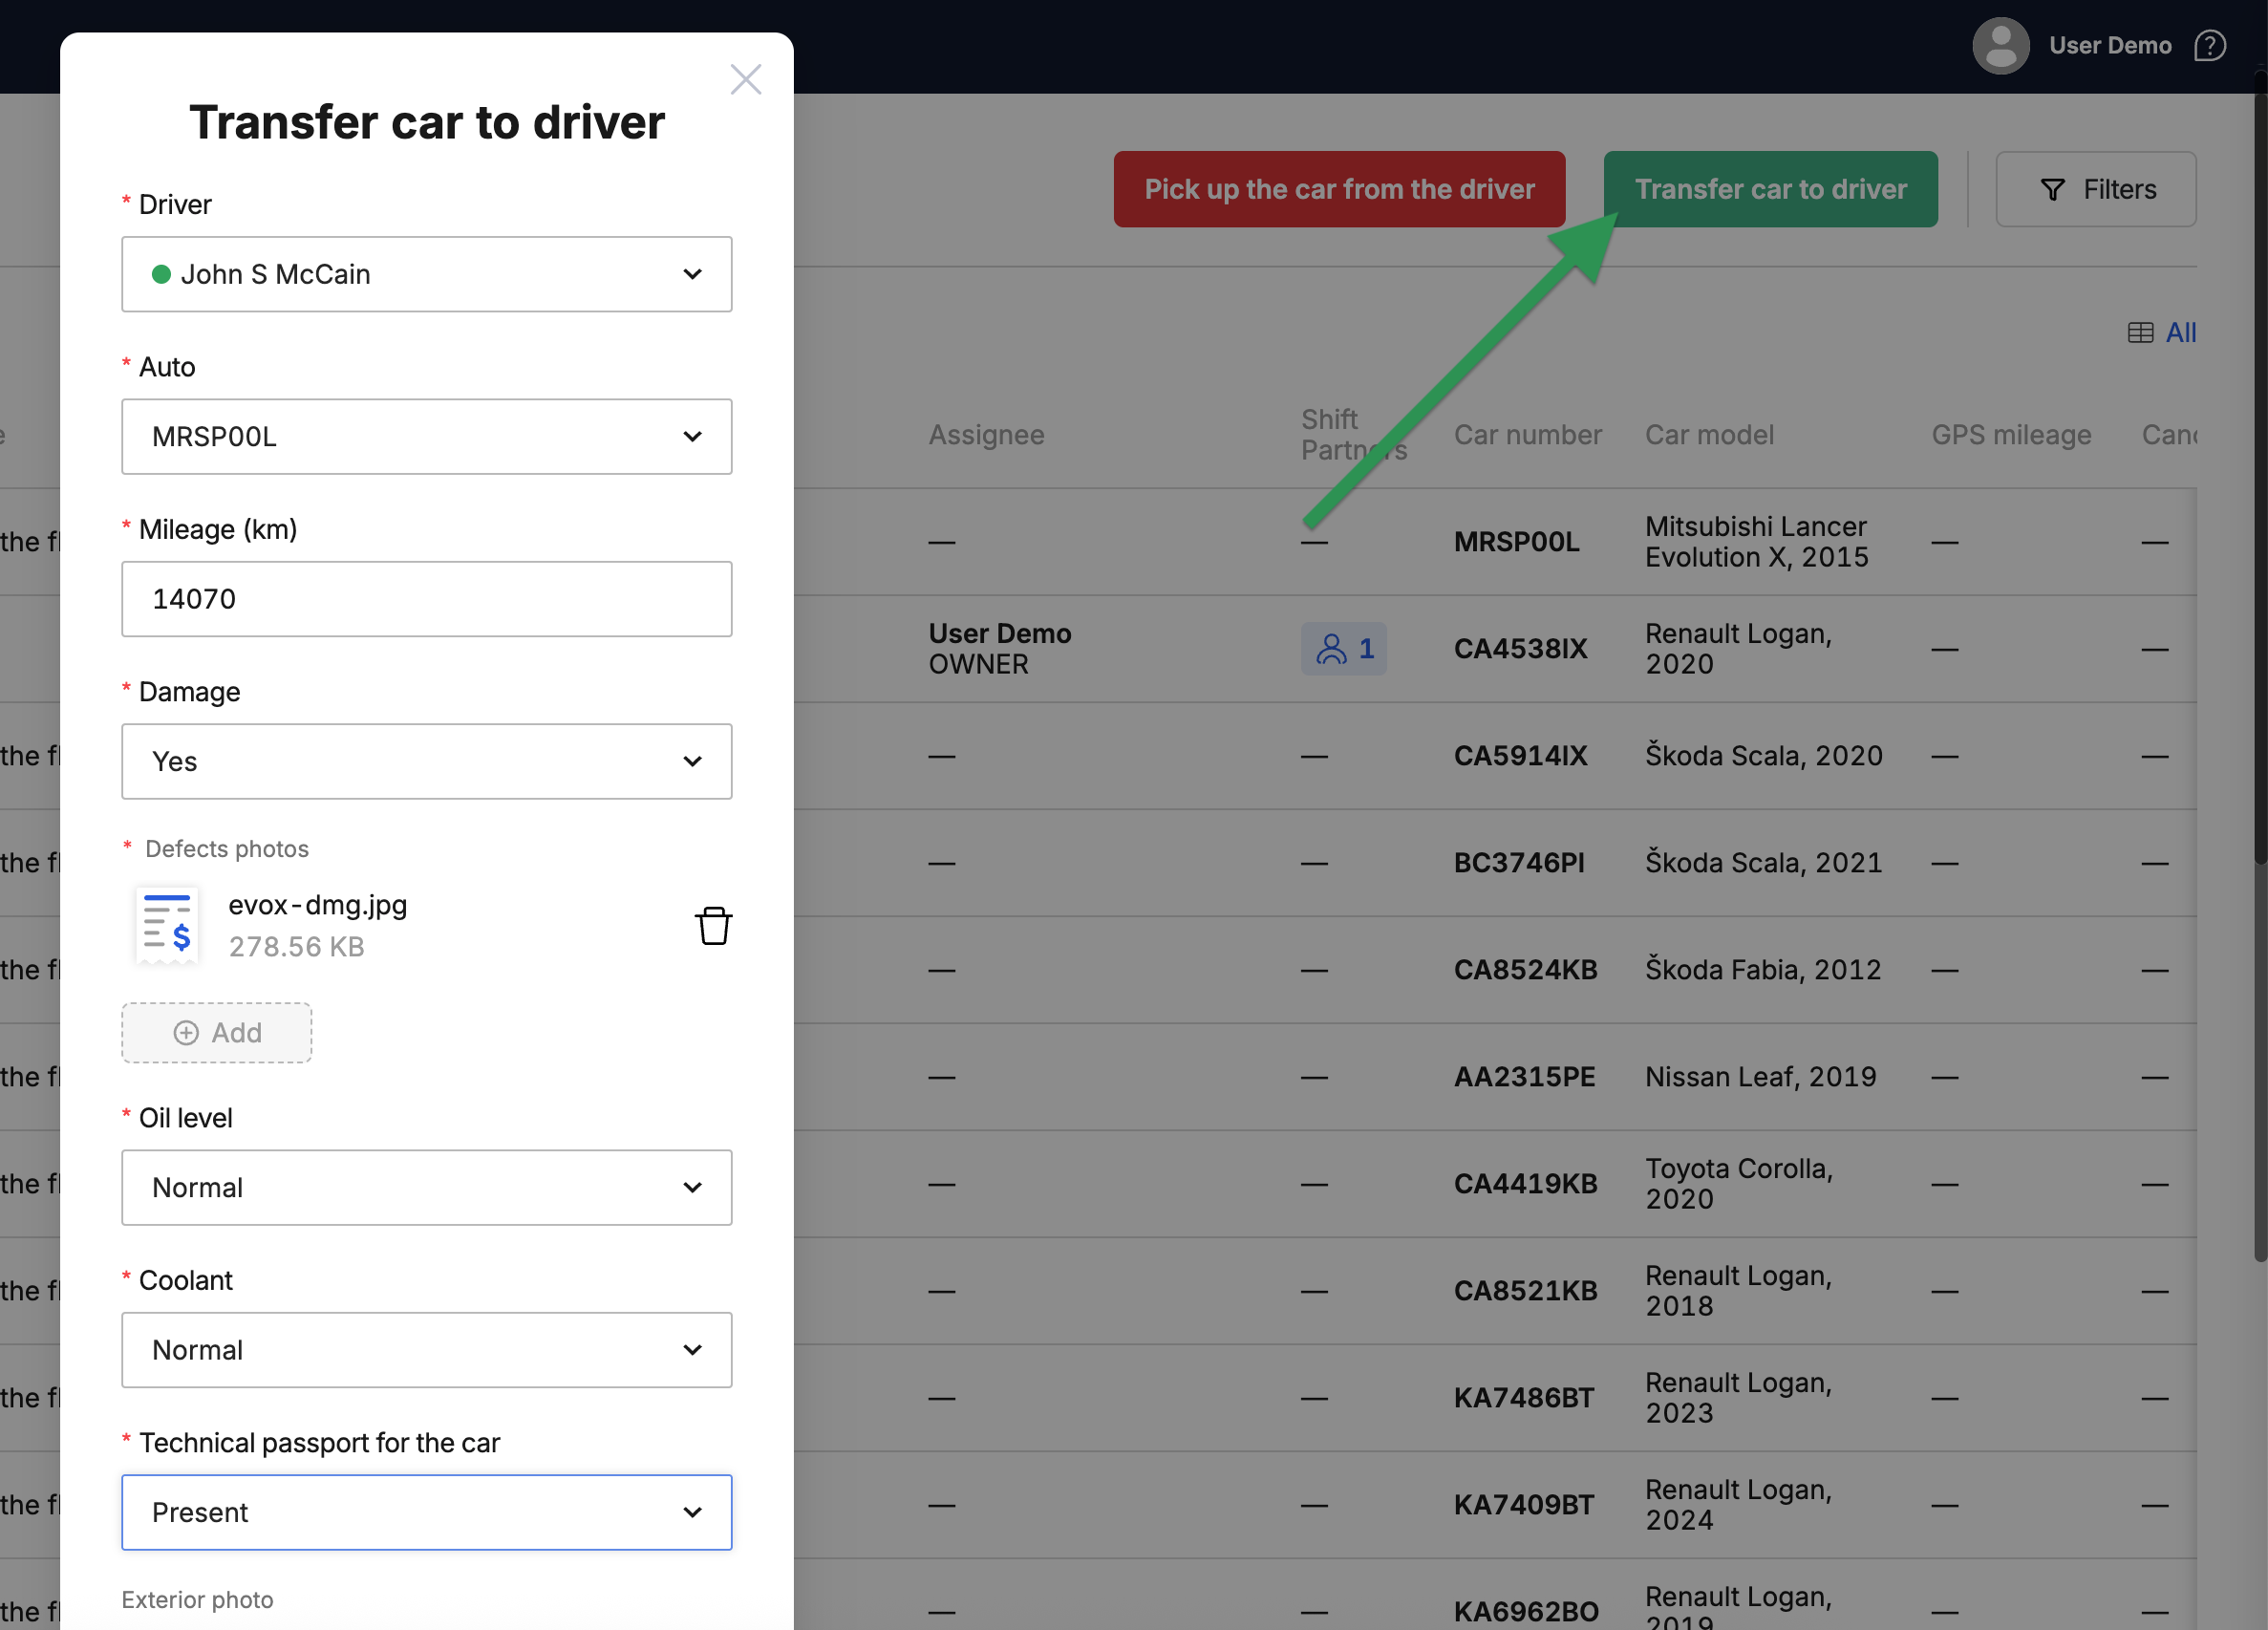
To assign a car to a driver from the fleet using a handover act, follow these steps:
- Go to the Vehicle Handover section in the MyTaxiCRM menu on the left (at the level of a specific fleet);
- Click the green Transfer car to driver button at the top right;
- In the Driver field, select the person to whom you plan to transfer (assign) the car;
- In the Auto fiels, select the desired vehicle by its registration number (license numberplate);
- In the Mileage (km) field, enter the current value of the vehicle's odometer;
- In the Damage menu, select whether you are transferring a car with any cosmetic damage:
- If you select Yes → an additional item Defects photos will appear below, along with the ⊕ Add button, which you can use to upload at least one or more photos of the damage.
- If you select No → nothing else needs to be done in this item.
- In the Oil level menu, select the appropriate option:
- Normal → level within normal operating specifications.
- Refill required → oil must be added and the technical condition of the ICE must be monitored.
- In the Coolant menu, select the appropriate option:
- Normal → level within normal operating specifications.
- Refill required → cooling fluid needs to be topped up and the technical condition of the cooling system needs to be monitored.
- In the Technical passport for the car menu, select the appropriate option:
- Present → vehicle registration certificate (technical passport) is valid & available.
- Missing → the vehicle does not have a certificate of state registration (technical passport).
- The Exterior photo block is necessary so that when the car is handed over to the driver, the latter can assess & confirm the declared condition of the vehicle body/paintwork, the absence/presence of damage, and accept the responsibility:
- Front → ⊕ Add (we recommend taking a photo so that the numberplate is visible).
- Back → ⊕ Add (photo of the vehicle's rear).
- On the right side → ⊕ Add (photo of the right side).
- On the left side → ⊕ Add (photo of the left side).
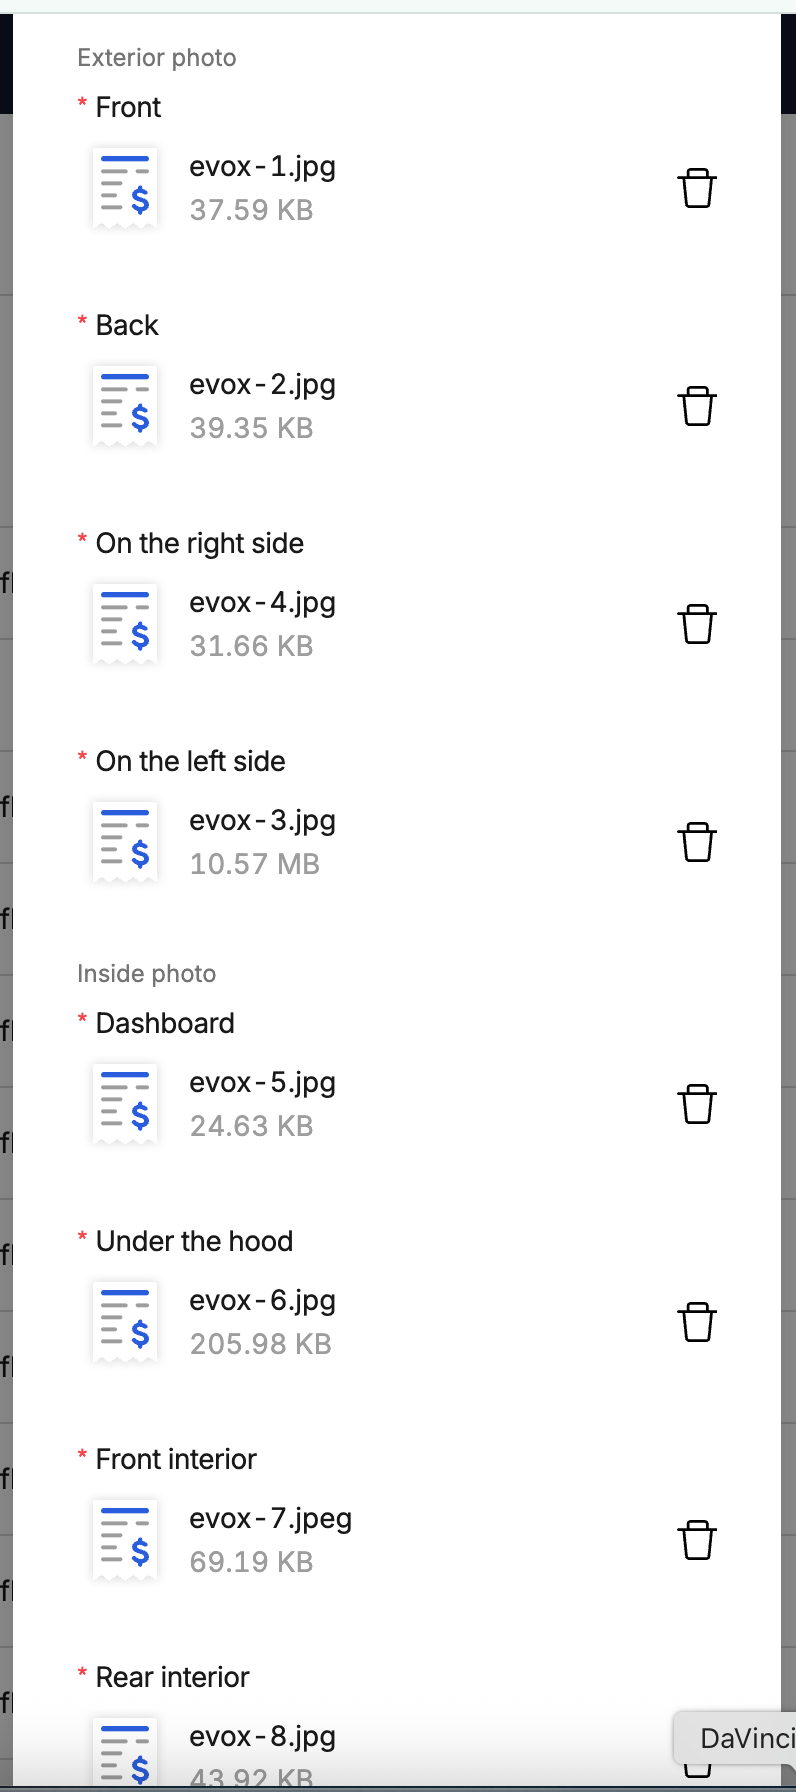
- The Inside photo block is necessary so that when the car is handed over to the driver, the latter can assess & confirm the declared condition of the interior and engine compartment, the absence/presence of damage, and accept responsibility:
- Dashboard → ⊕ Add (photo of the instrument cluster; we recommend doing this with the engine running so that the readings are visible in the shot, such as the odometer reading, the presence/absence of error indicators, etc.).
- Under the hood → ⊕ Add (open the bonnet, secure the lid, take a photo of the components & assemblies).
- Front interior → ⊕ Add (photo of the front of the cabin).
- Rear interior → ⊕ Add (photo of the passengers' compartment).
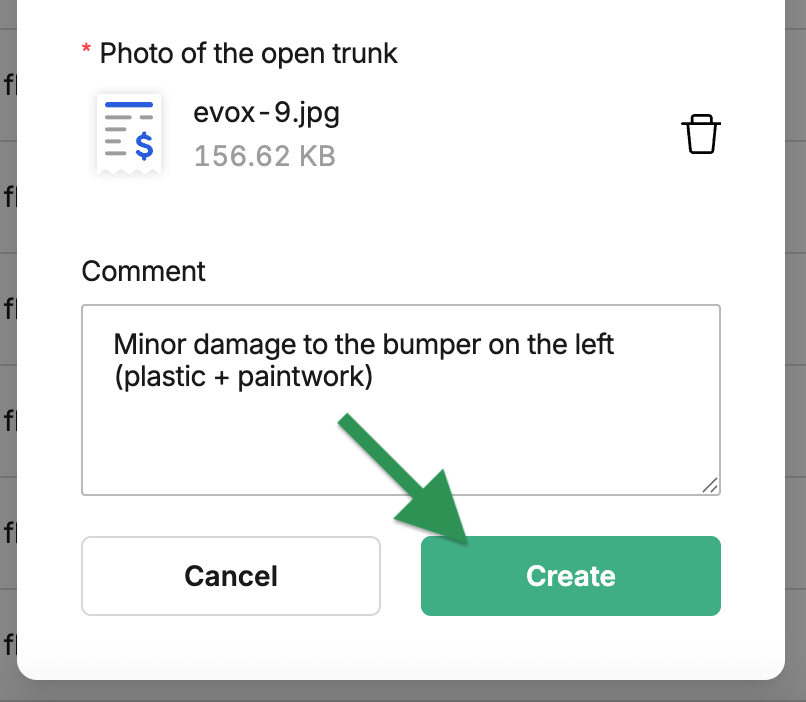
- Photo of the open trunk → ⊕ Add (open the trunk lid and take a photo).
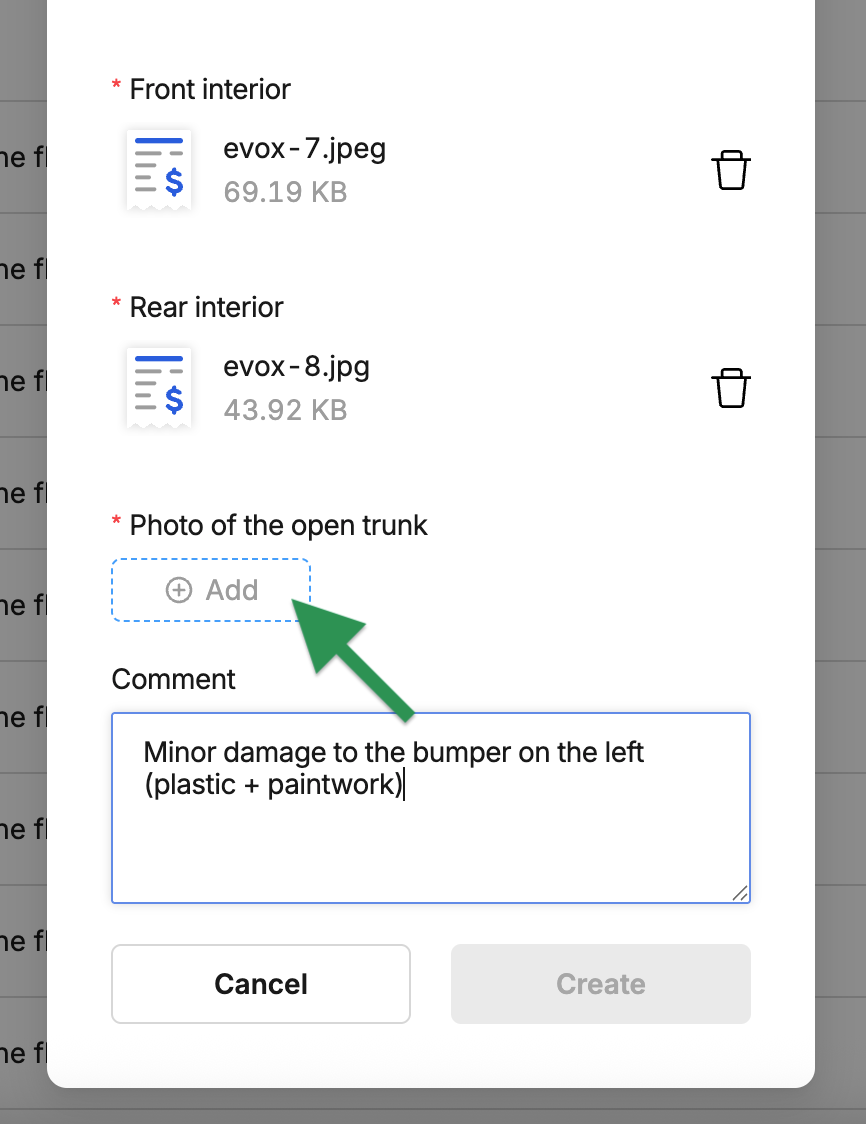
- In the Comment field, add a note for yourself or the driver (for example, about the technical condition of the car being transferred, any special features of its operation, etc.) → click the green Create button.
⚠️ Please note that the Create button will become active (turning green) only when all fields are filled in & all mandatory menu items are selected (marked with a red asterisk * next to the name).
⚠️ The forms of handover acts themselves are flexibly customizable – the fleet can change the necessity and/or visibility of various fields according to your company's needs (meaning that you can customize the number of photos required when filling out the form or the mandatory selection of a particular item).
¶ Depicting a newly created act in the system
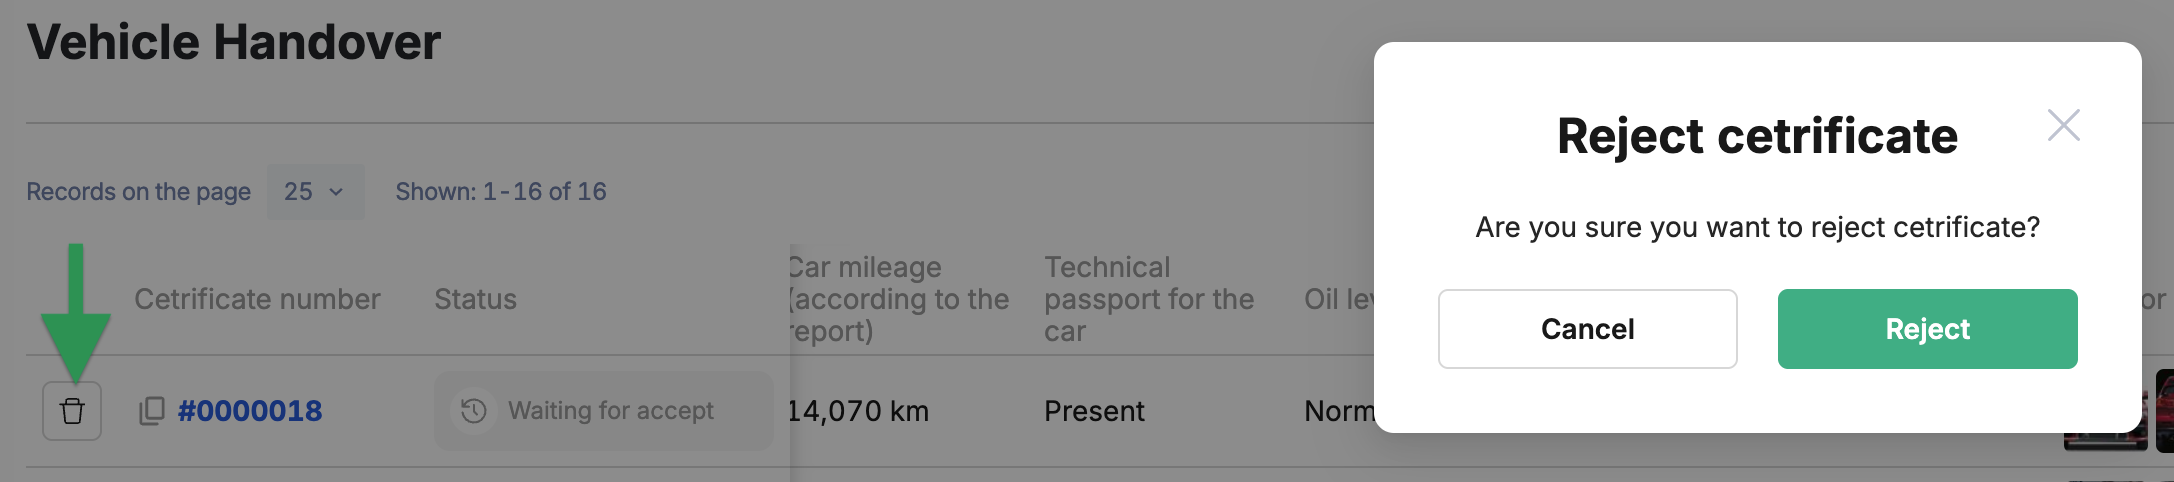
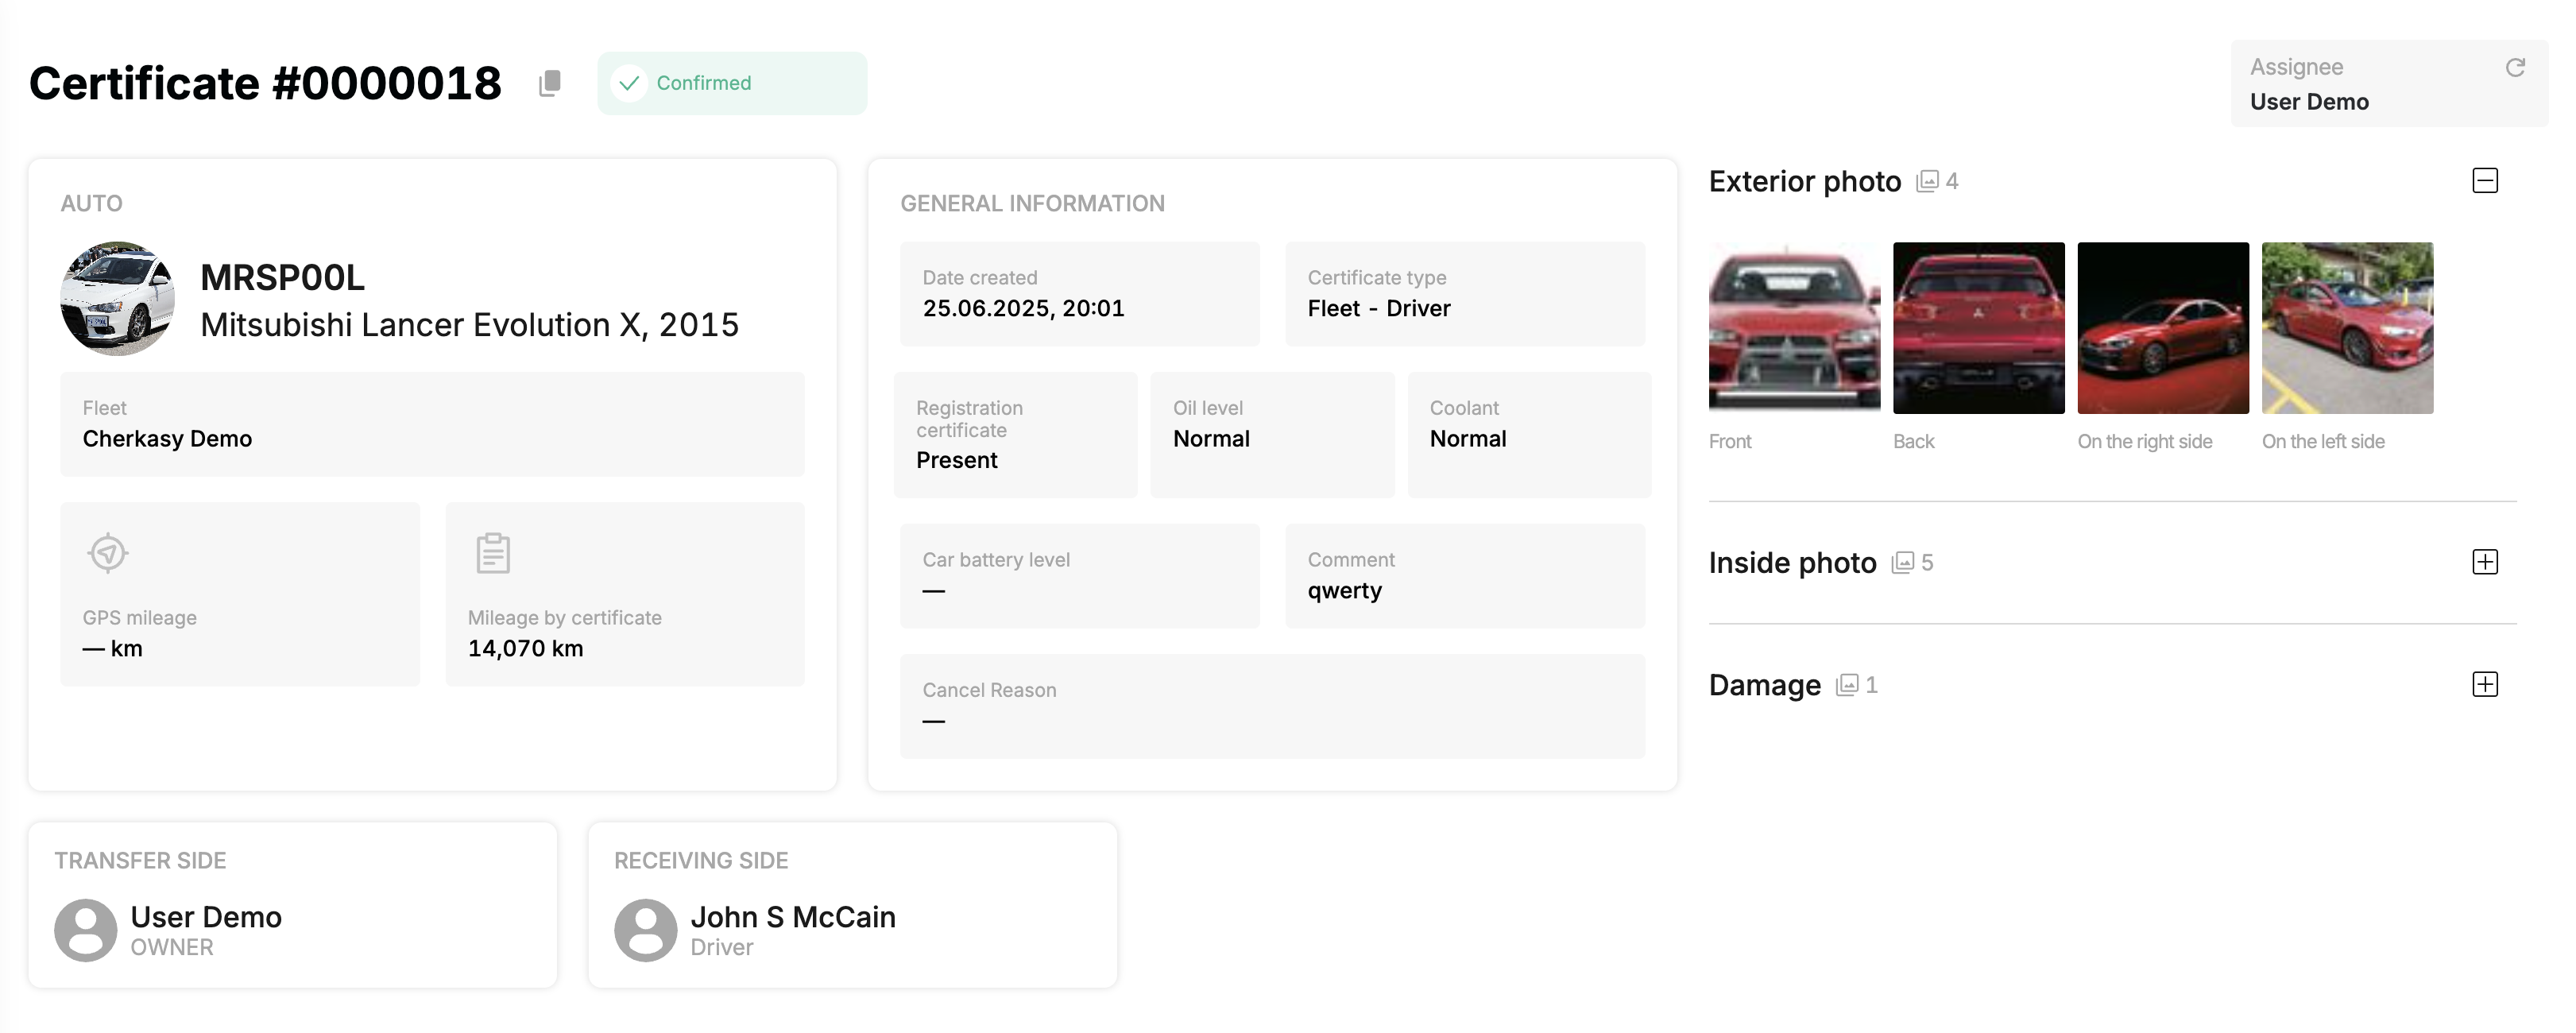
After creation, the corresponding act immediately appears in the list on the Vehicle Handover section page, and a unique identifier is assigned to it for record keeping purposes (Certificate number column).

Status of the newly created act is showed in Status column → «Waiting for accept».

The right part of the list of acts can be scrolled to the right.
- In each of the columns corresponding to the fields of the act, you can see the details that were added when it was created.
- Some columns (such as GPS mileage) can be filled in automatically by the system (if the required device or counter is installed and the data from it is processed by MyTaxiCRM).

¶ Actions available with the created handover act
You can open the act itself to view all its details & info in a more convenient format → to do this, click on its number (unique identifier) in the list.

If the act was not accepted by the driver → you can reject (cancel) it:
- to the left of its number, use the 🗑️ button → then Reject.
¶ Act in the driver's personal cabinet app
Right away, on the main screen of the app in the personal cabinet of the driver to whom you are transferring (assigning) the car using the handover act, they will see a notification about the event (the handover act pending a review).
The following information will be immediately visible:
- photo of the vehicle,
- registration number (numberplate
MRSP00L), - make (brand) & model of the vehicle (
Mitsubishi Lancer Evolution X), - unique act identifier (a number like
#XXXXXXXX), - View the certificate button.
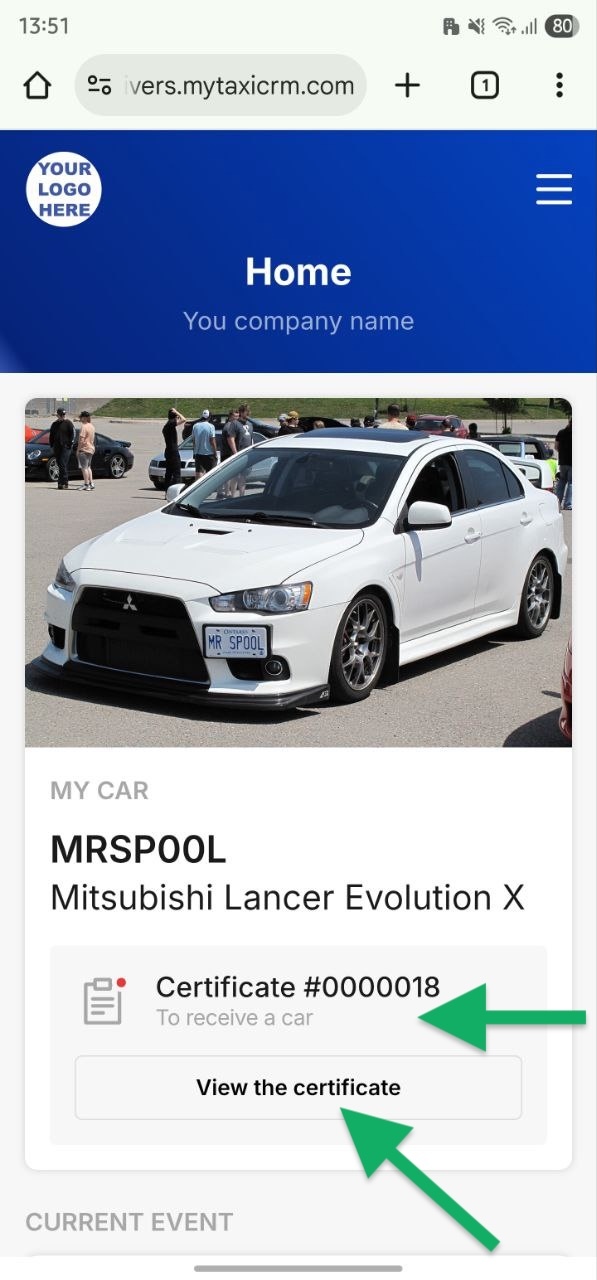
The driver must click on the View the certificate button to view the full details & perform one of two possible actions:
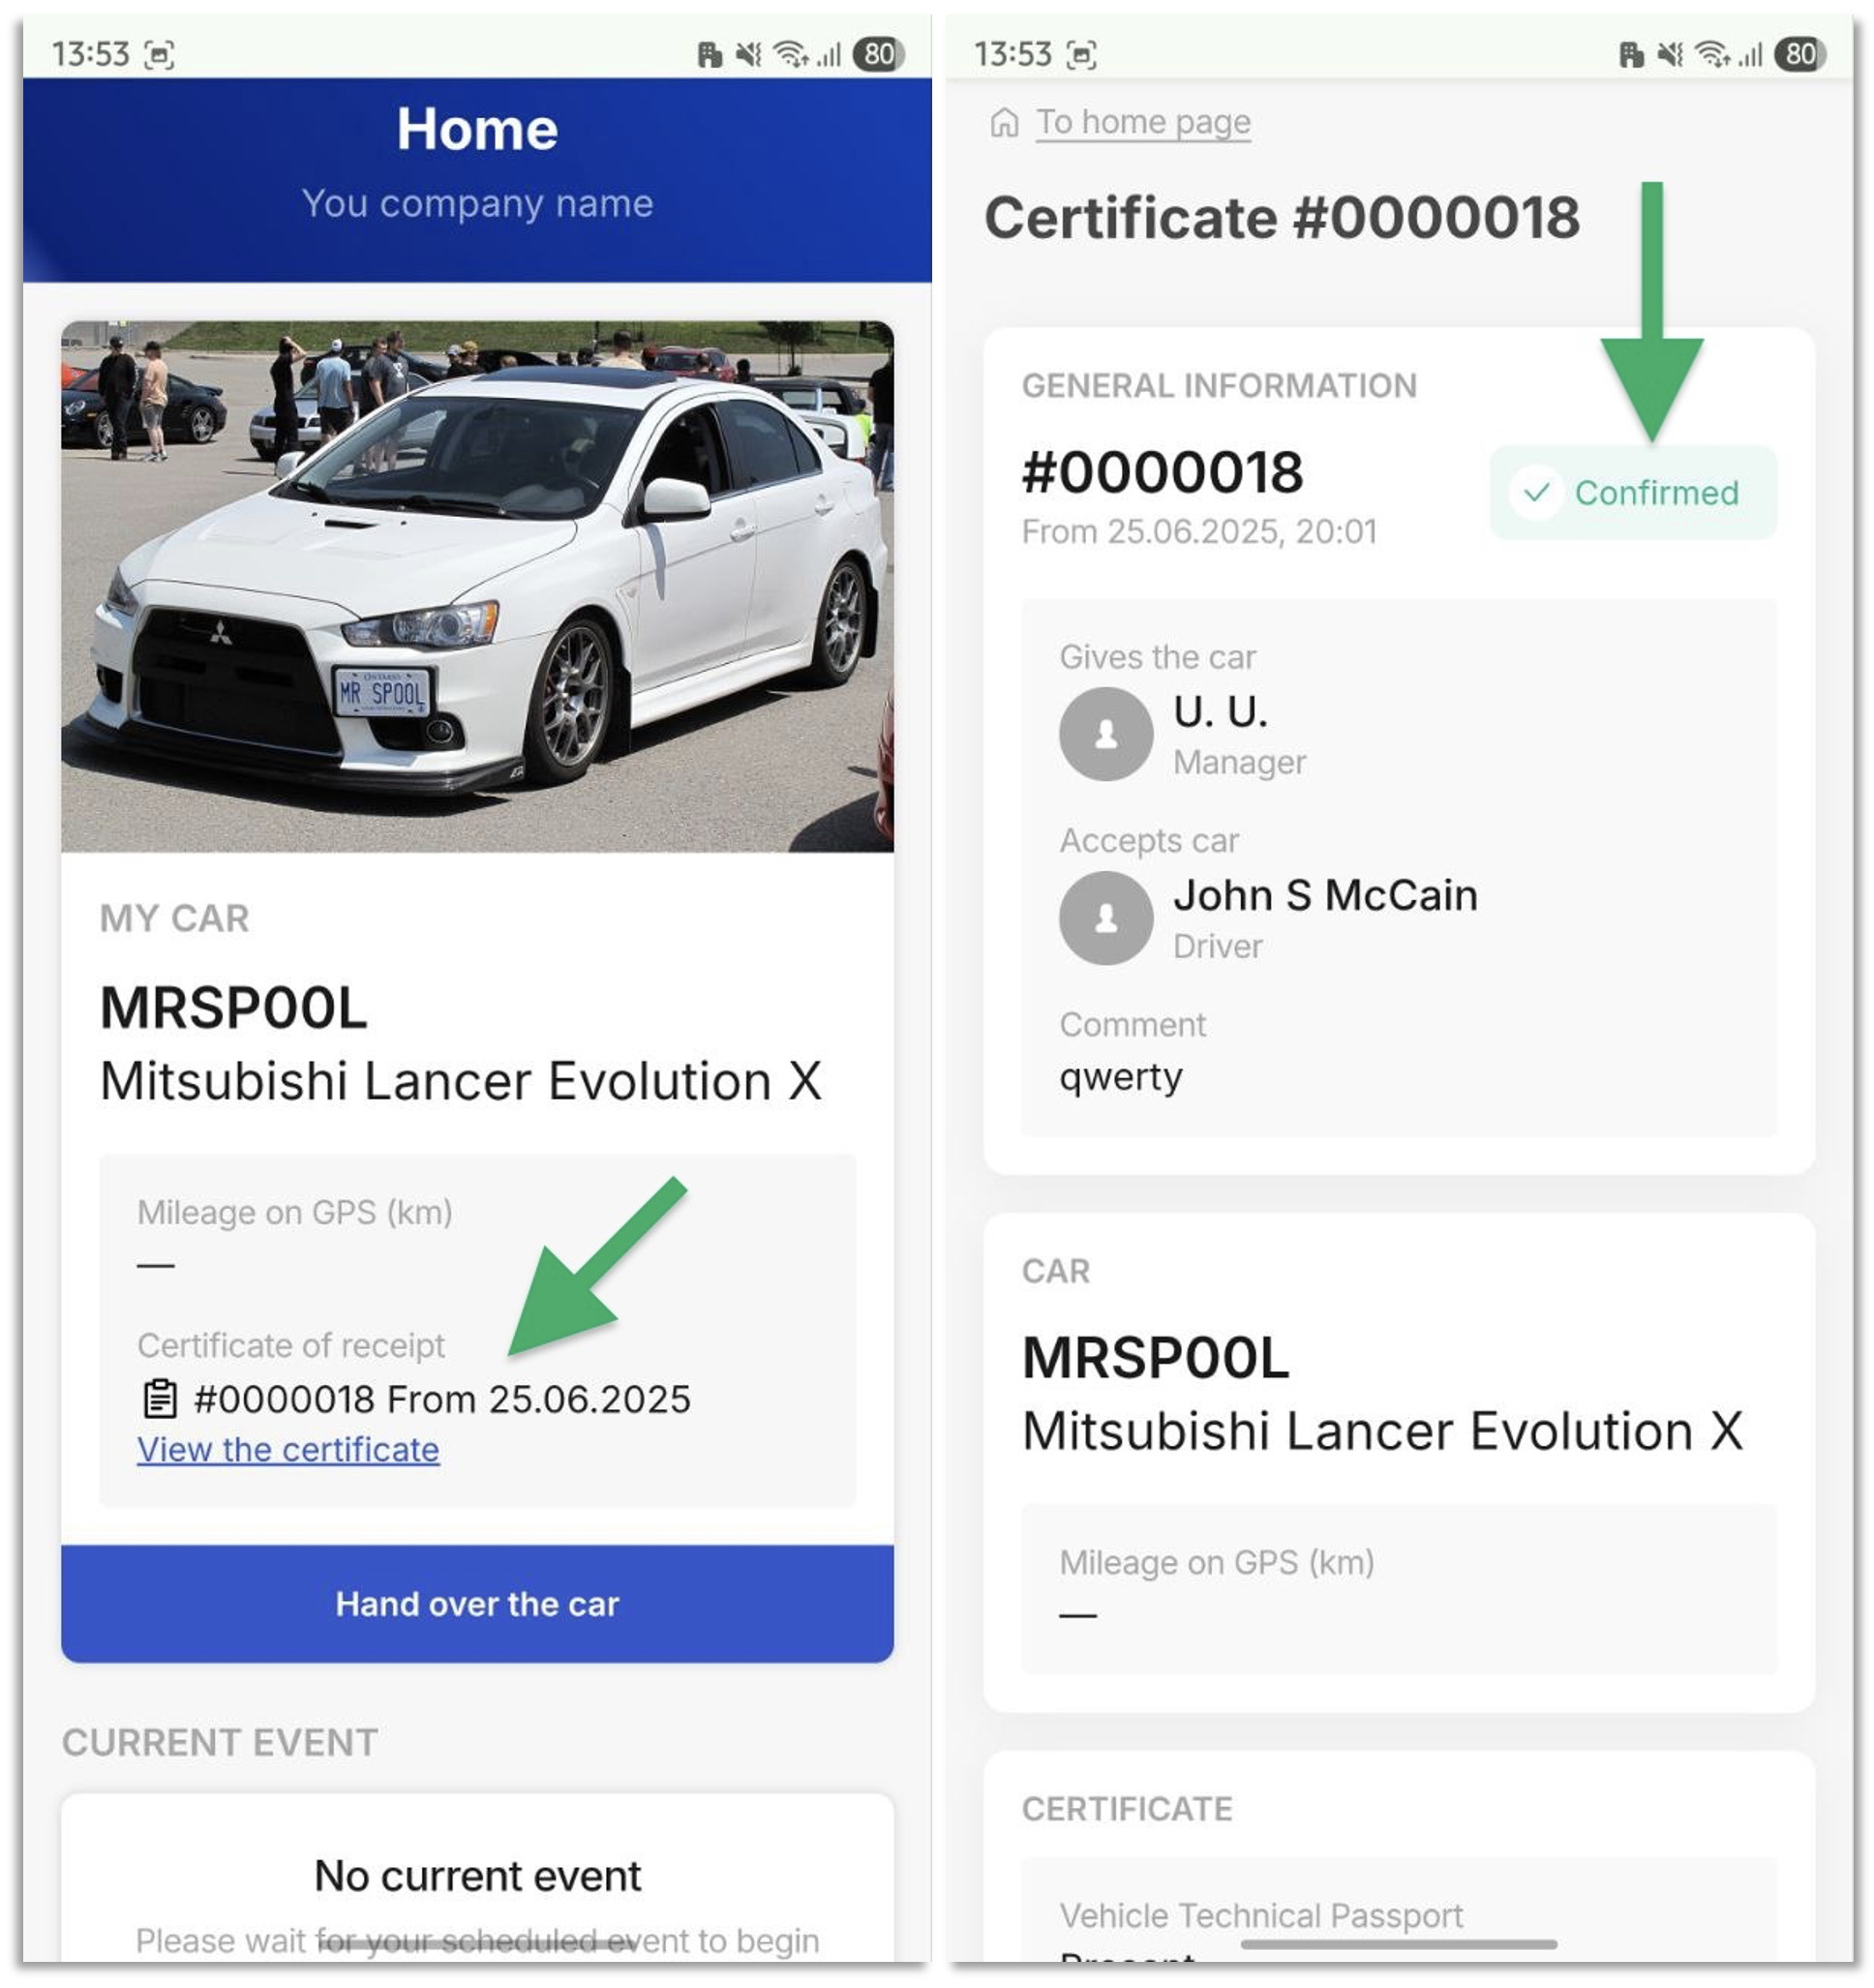
- The gray Reject button is used by the driver when the actual condition of the vehicle upon physical inspection differs from that described in the act (for example, there is damage that is not indicated in the act).
- The blue Accept button allows the driver to agree with the information in the act and receive the car for use.

When the driver accepts the act (with the blue Accept button):
- In his app, the car is now listed as being under his responsibility & available for use (the date of acceptance appears next to the act number);
- You can view the act under which the car was received (blue text View the certificate under its number): the status of the act has changed to ✓ Confirmed.
¶ Accepted act in the system
As soon as the act is accepted by the driver, its status in the list on the Vehicle Handover page (Status column) changes from «Waiting for accept» to «✓ Confirmed».

The status change is also reflected in the act itself if you open its detailed view.
In the «Timetable» tool, the system will automatically display the fact that the car has been issued to the driver from fleet with a corresponding rectangle, which will enlarge starting from the date of the act acceptance:
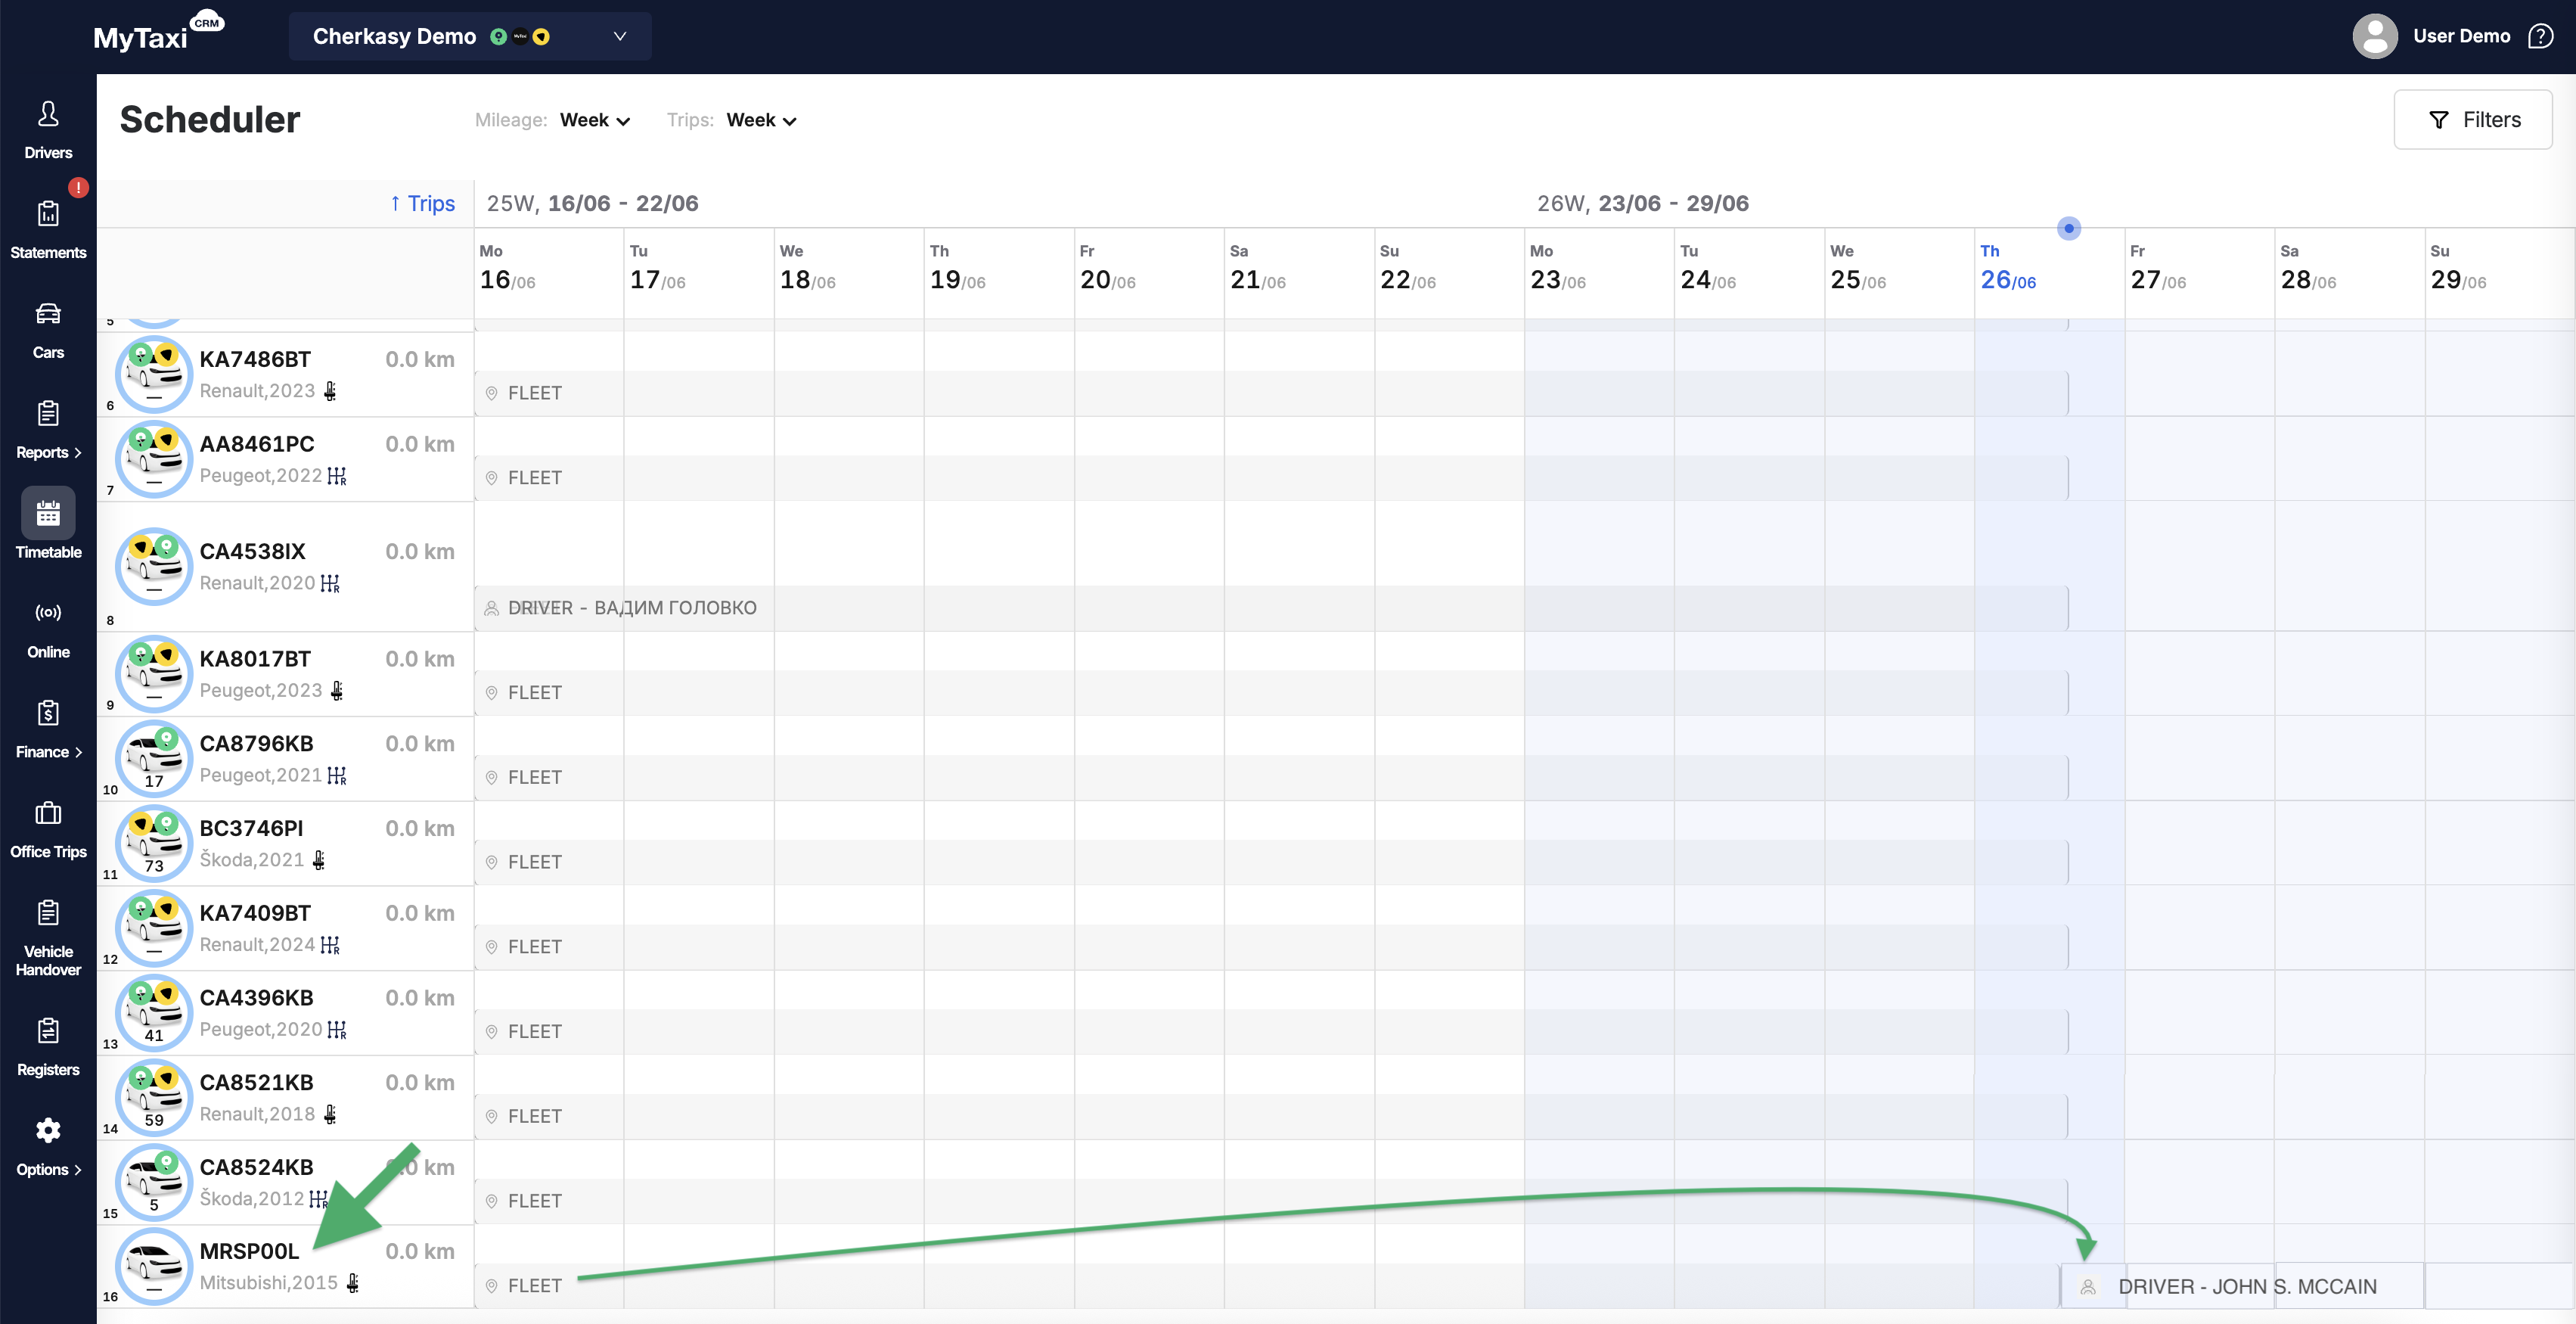
MRSP00L | FLEET → DRIVER - JOHN S. MCCAIN
¶ Video Tutorial

📹 Check out related video explainer from our YouTube channel below 👇 HERE